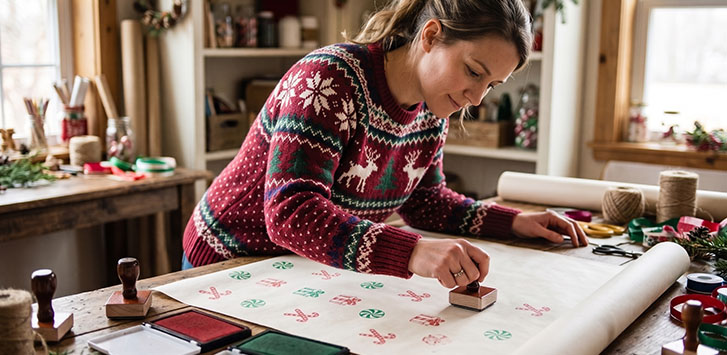
Store-bought wrapping paper gets the job done, but sometimes you want the outside of a gift to feel just as thoughtful as what's inside. DIY wrapping paper lets you choose your own colors, patterns, and messages without spending hours on a complicated craft project.
With plain paper, colorful ink, and a few rubber stamps, you can decorate an entire sheet with repeating patterns, seasonal images, or personalized messages. Whether you're preparing Christmas presents, birthday gifts, wedding favors, or handmade products, stamps make it easy to create patterns and designs you can use again and again.
This guide covers how to make your own wrapping paper, creative DIY wrapping paper ideas, and ways to use custom rubber stamps to personalize every package.
Why Make Your Own Wrapping Paper?
Making your own wrapping paper lets you customize gifts while putting reusable craft supplies to work. A single stamp can decorate multiple sheets of paper, making it useful for wrapping several presents.
- Personalization: Add names, initials, or messages that make gifts feel more thoughtful.
- Creative freedom: Mix stamp designs and ink colors to suit different occasions.
- Coordinated gifts: Match your wrapping paper with handmade cards, gift tags, and other packaging details.
Once you have a few favorite stamps, you can use them for different projects throughout the year.
Supplies You'll Need for DIY Wrapping Paper
Gather a few basic materials before getting started:
- Plain paper: Choose kraft paper or smooth, uncoated wrapping paper.
- Rubber stamps: Try seasonal designs, craft stamps, or personalized stamps.
- Ink pads: Select colors and ink suitable for your paper.
- Scissors and tape: Cut and secure your wrapping paper.
- Optional decorations: Add ribbon, twine, or handmade tags.
Wood handle stamps let you switch between ink colors, while self-inking stamps are convenient for repeating a single design.
How to Make DIY Wrapping Paper with Rubber Stamps
Once you've gathered your supplies, you're ready to start stamping. Follow these four steps to turn plain paper into gift wrap with your own pattern or design.
Step 1: Choose your paper and stamps
Start by choosing a color scheme for your wrapping paper. Black ink on brown kraft paper creates a rustic look, while bright colors on white paper work well for birthdays and holidays. Then, select stamps that complement your theme. Smaller designs are ideal for repeating patterns, while larger stamps can serve as a centerpiece.
Step 2: Plan your design
Before applying ink, decide how you want your pattern to look. You might arrange stamps in evenly spaced rows, alternate two different designs, or scatter images randomly for a playful appearance.
Step 3: Stamp your wrapping paper
Lay your paper on a flat, protected surface. Press your stamp into the ink pad, then apply even pressure to the paper without rocking the stamp. Re-ink between impressions and continue until you've covered your desired area.
Step 4: Wrap and decorate your gift
Once the ink is dry, wrap your present as usual. Finish with ribbon, twine, or a coordinating gift tag. Complete the look with DIY gift tags featuring the same stamps and ink colors.
Creative DIY Wrapping Paper Ideas for Any Occasion
Looking for DIY wrapping paper ideas beyond Christmas? Try these stamped designs for birthdays, weddings, handmade gifts, and other special occasions.
- Birthday wrapping paper: Use balloons, stars, hearts, or other playful designs to create colorful birthday wrapping paper. Alternate bright ink colors or stamp a birthday message throughout the paper.
- Wedding and anniversary gift wrap: Monogram stamps can give wedding and anniversary gifts a polished, personal appearance. Stamp the couple's initials across white or kraft paper, then finish with satin ribbon or greenery.
- Handmade gifts and small business packaging: If you sell handmade products or prepare homemade gifts, custom wrapping paper can make your packaging more recognizable. A custom logo stamp allows small businesses to repeat their branding across kraft paper, gift bags, and packaging inserts without ordering preprinted materials.
DIY Christmas Wrapping Paper Ideas
Making your own Christmas wrapping paper is a fun way to give holiday presents an extra handmade touch. Whether you love classic red and green, rustic kraft paper, or minimalist winter designs, rubber stamps make it easy to decorate multiple gifts with your favorite holiday patterns.
Here are a few easy DIY Christmas wrapping paper ideas:
- Christmas trees: Stamp small trees across kraft paper using green ink, then add red ribbon for a traditional holiday look.
- Candy canes and peppermint candies: Alternate red candy cane and peppermint stamps for a playful, festive pattern.
- Snowflakes: Use blue, silver, or white ink on compatible paper to create winter-inspired wrapping paper.
- Holiday characters: Add Santa Claus, elves, or reindeer stamps to create cheerful wrapping paper for children's presents.
- Christmas greetings: Repeat a holiday message across plain paper or use one large greeting stamp as the centerpiece.
You can also use Christmas "To/From" stamps on coordinating gift tags to make labeling presents easier. Pair your wrapping paper with DIY Christmas cards featuring similar stamp designs.
Make Your Own Wrapping Paper with a Custom Stamp
Want wrapping paper you won't find in stores? A custom rubber stamp lets you turn your own artwork, family name, or special message into a reusable design.
For example, you could create a holiday stamp featuring an illustration of your family dog wearing a Santa hat, with "Merry Christmas from the Johnson Family" underneath. Repeat the design across kraft paper to create Christmas gift wrap for friends and relatives.
The possibilities extend beyond Christmas, too. Try a family monogram for birthday gifts, a custom illustration for wedding favors, or an original logo for small business packaging.
The StampMaker lets you create a custom rubber stamp using your own text or artwork, so you can reuse your design for wrapping paper, cards, gift tags, and other crafts.
Tips for Making Your Stamped Wrapping Paper Look Great
Uneven impressions and smudged ink can affect your finished wrapping paper. Keep these tips in mind to get clearer designs and avoid common stamping mistakes.
- Use a firm, flat surface: Place your paper on a smooth table or work surface to help distribute pressure evenly and prevent incomplete impressions.
- Leave enough space: Avoid overcrowding your pattern so individual stamp designs remain easy to recognize.
- Mix stamp sizes: Combine larger focal designs with smaller decorative images for more visual interest.
- Reink between impressions: Apply fresh ink before each stamp to keep your patterns clear, especially when covering a large sheet of wrapping paper.
- Clean stamps between colors: Remove leftover ink before switching shades to prevent colors from mixing. Clean and store your stamps after each project so they're ready for next time.
Remember that handmade wrapping paper doesn't have to look perfectly uniform. Small variations in spacing and impressions can add character to your finished design.
Create Your Own Gift Wrap with The StampMaker
You don't need specialty paper or advanced crafting skills to make gift wrapping feel personal. With a few rubber stamps and your favorite ink colors, you can turn plain paper into festive Christmas wrap, colorful birthday packaging, or a completely original design.
Ready to try it yourself? Explore The StampMaker's craft stamps or create your own custom rubber stamp to start decorating your next gift.